Projection and Monitor Tips and Fixes:
1. Duplicate vs Extend Settings: (Windows Key W) + (P) will bring up a couple of options on our campus computers. Duplicate will duplicate the video on the monitor to the video on the projector. The Extend option will show both of the screens separately and you will need to drag applications from the monitor to the projector.
More Information:
(Windows Key W) + (P) will bring up a menu on the computer screen that will let you choose the projector settings of PC Screen Only, Duplicate, Extend, and Second Screen only. The computers should be defaulted to the "Duplicate" project setting. The classroom computers are frozen with this setting configured. Duplicate means you will see the same video feed on the classroom monitor and the projector screen. Extend means that you will have two different screens to use. Applications will only be viewable on one screen at a time, and will need to be dragged over to the projector screen in order to viewed on the projector.
2. Monitor Quick Fixes: Check to make sure the monitor cables are all plugged in all the way. Turn the monitor off and then on again, and then restart the computer.
More Information:
Sometimes computer monitors will not work initially and can be quickly troubleshot by a faculty member before calling the AV or ICS department. Initial troubleshooting steps include the following: making sure the monitor is turned on, checking the cable connection to the monitor and trying to plug it back in (sometimes cables are tied too tight, and when a monitor is slightly moved the connection can become unplugged), and making sure that the monitor is on the correct display source (Monitors are sometimes accidentally set to auto source and it is more safe to choose the source that the computer is actually coming from). If these three steps do not fix the monitor and the computer is still not being seen on the screen, then please contact the Miramar AV or ICS department to report your issue.
3. Projector Quick Fixes: (Windows Key W) + (P) and make sure the computer is not on "PC Screen Only". Then power off the Extron system and power it back on. Then restart the computer system. This power cycle sometimes fixes hang ups in the Extron software.
More Information:
There are 2 quick fixes that can be preformed before a tech needs to come and check on your system.
- The first thing that should be checked is that the computer is not on "PC Screen Only" Project Setting. To check this, we need to press the (Windows Key W) + (P) buttons on the keyboard and then select either the "Duplicate" or "Extend" project settings.
- The second fix we recommend trying is turning off the computer and the Extron system. First we will hit the "Off" button on the Extron system and let it start shutting down. The "Off" button should start blinking white and will stop blinking when the entire system is shut down. While this is shutting down, we recommend restarting the computer. The Computer will restart completely first, and once the computer is back on, you should hit the "On" button on the Extron system. After the projector screen starts to display a screen please make sure that the "PC" button on the Extron system is pressed and lit up brighter than the other source buttons (Ex. Laptop, HDMI, etc.). If this does not fix your projection issue, please contact the Miramar AV or ICS department to report your issue.
4. Extron Quick Fix (Classroom Video and Audio Switcher): If you are having trouble with your Extron system, an example would be that all of the lights are flashing or the projector is not turning on, please press the "Off" button. The "Off" button will begin to flash, and once everything is turned off, the button will go back to a dim color. Once all of the buttons are back to the same dim color, please press the "On" button again. If this does not fix the issue, please contact the Miramar AV department.
Windows 11 Update:
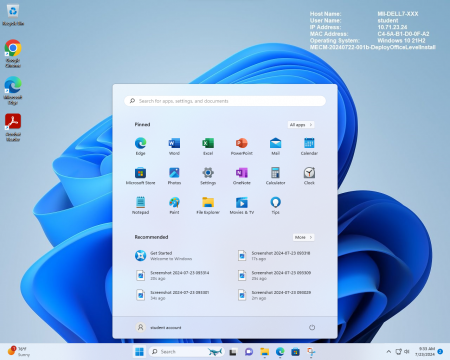
This summer, (Summer of 2024) we are currently starting the transition from Windows 10 to Windows 11 on our classroom computers. This update has some appearance changes, but Windows 11 mostly functions similarly to Windows 10. The main difference is that the Start Menu is now in the middle of the taskbar on the desktop. Clicking on the Windows Logo will bring you to an updated start menu where you can find your Office applications and web browsers. The search bar, in the taskbar, can be used to search for apps, settings, or even web based searches. On the left is a screenshot of an average podium computer screen, while the left is a look at the new start menu. We are making this upgrade for security and performance purposes, as Windows 10 is nearing its end of life cycle. If you have any questions, you can contact the Miramar ICS Department.

Important Phone Numbers:
District IT Department: (619) 388 - 7000 or [email protected]
This department should be contacted if you are experiencing issues with @sdccd.edu accounts, office computers, office printers, or other admin devices.
Miramar AV Department: (619) 388 - 7317 or [email protected]
This phone number should be called if your are experiencing issues with Audio or Video inside of a classroom.
Miramar ICS Department: (619) 388 - 7317 or [email protected]
This department should be contacted if you are experiencing issues with classroom or lab computers, classroom printers, or other devices inside of the classroom.